
 under-the-t-top
How to Waterproof LED Light Connections
Table of Contents
- Understanding IP Ratings for LED Light Connections
- Tools and Materials Required
- How to Cut and Prepare LED Strip Connections
- Marine Grade Heat Shrink Tubing Techniques
- Using Dielectric Grease for Electrical Connections
- Applying Silicone Sealant and End Caps for Waterproofing
- Best Practices for Marine LED Installation and Long-Term Maintenance
- Common Mistakes in Waterproofing LED Connections
- Conclusion
- Frequently Asked Questions
Last Updated: September 21, 2026
Understanding IP Ratings for LED Light Connections
IP ratings define how well LED light connections resist water and dust, and understanding how to waterproof LED light connections is essential for marine installations. The "IP" stands for ingress protection, and the two-digit code tells you exactly what your connection can handle. For marine and outdoor LED installations, understanding these ratings is the difference between lights that last years and connections that corrode within months.

The first digit rates dust protection (0-6), and the second rates water protection (0-9). For LED strip lights, you'll typically see IP65, IP67, or IP68. Here's what each means in practice:
- IP65: Protected against water jets from any direction. Safe for deck spray and rain, but not submersion.
- IP67: Protected against temporary immersion up to 1 meter for 30 minutes. Handles wave splash and brief dunking.
- IP68: Protected against continuous immersion. Submersible for extended periods. Best for underwater applications.
Most boat owners and RV enthusiasts choose IP67 or IP68 for LED connections because these ratings handle real-world saltwater exposure and accidental submersion. At T-Toplights, we engineer our marine-grade LED lighting with IP69K and IP67 waterproof ratings specifically because open-water environments demand that level of protection.
The rating alone doesn't guarantee durability. A connection rated IP67 will fail if you use the wrong materials during installation. The sealant, heat shrink tubing, and connectors all matter equally.
Tools and Materials Required
Before you start learning how to waterproof LED light connections, gather the right supplies. Using cheap substitutes or skipping steps is the most common reason connections fail within a season.
Essential tools:
- Wire strippers (for 22-26 AWG wire)
- Precision cutting tool or LED strip cutter
- Heat gun or lighter
- Soldering iron and solder (or solderless connectors)
- Crimping tool (if using crimp connectors)
Critical materials for waterproofing:
- Adhesive-lined heat shrink tubing (3:1 shrink ratio minimum)
- Marine-grade silicone sealant (100% silicone, not acrylic)
- Dielectric grease for electrical connections
- Silicone end caps with 2 holes for wire leads
- Solderless connectors rated for low voltage (12V or 24V)
- Wire gauge appropriate to your circuit (typically 18-22 AWG for LED strips)
The adhesive-lined heat shrink is non-negotiable. Regular heat shrink provides insulation but not a moisture barrier. Adhesive-lined tubing melts and seals around the joint, creating a hermetic seal that blocks water infiltration.

T-Toplights offers 10mm silicone end caps in packs of 10 at $5.95, designed for use with RTV silicone sealant (not included). These end caps fit IP68 SMD5050 strips and have 2 holes for wire leads.
How to Cut and Prepare LED Strip Connections
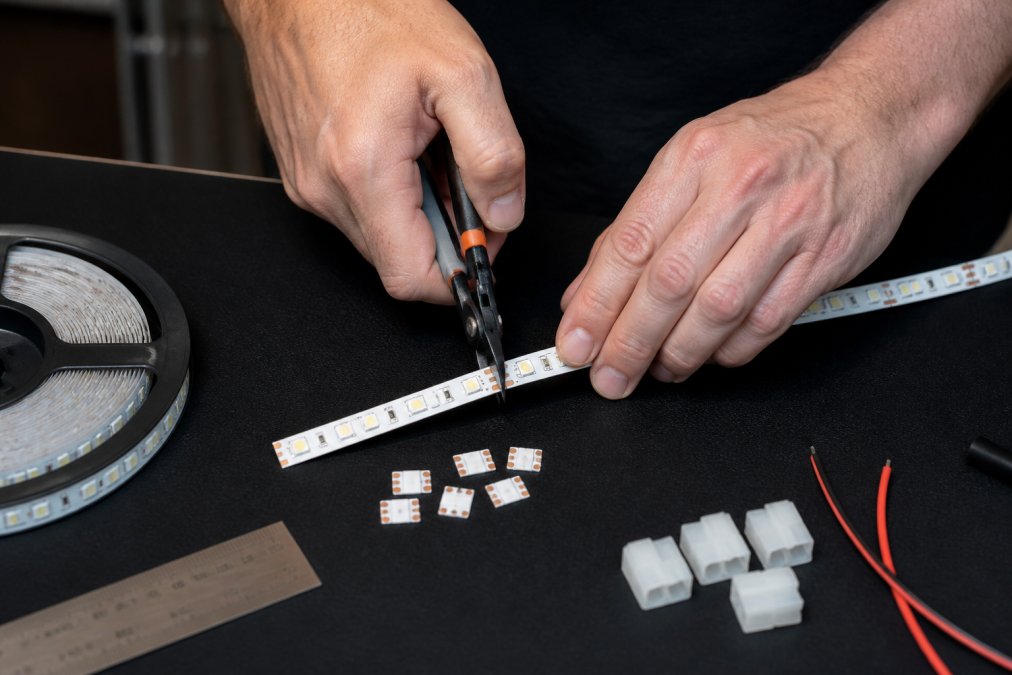
Cutting an LED strip incorrectly is where most waterproofing jobs fail before they even start. The PCB pads must be clean and exposed for proper connection integrity.
Step 1: Locate the cutting line. LED strips have marked cut zones between the copper pads. Never cut through a pad or resistor. Look for the dashed line printed on the strip.
Step 2: Make a clean cut. Use a precision cutting tool or sharp utility knife. Cut perpendicular to the strip, not at an angle. A ragged cut exposes more copper surface to oxidation.
Step 3: Inspect the PCB pads. The three pads (positive, negative, and data if applicable) should be clean and shiny. If they look dull or oxidized, gently scrub with a pencil eraser or fine sandpaper.
Step 4: Let the cut dry. If moisture got into the cut during handling, let it air dry completely before proceeding. Moisture trapped under heat shrink will cause corrosion.
Marine Grade Heat Shrink Tubing Techniques
Heat shrink tubing is your first line of defense against moisture. Marine-grade heat shrink with adhesive lining creates a moisture barrier that regular heat shrink cannot match.
Choosing the right size: Your heat shrink should fit snugly over the connection point. Too loose and water seeps in. Too tight and you'll crush the joint. For most LED strip connections, 3mm to 6mm diameter tubing works.
The 3:1 shrink ratio rule: This means the tubing shrinks to one-third its original diameter when heated. A 3:1 ratio provides better coverage than 2:1 tubing and grips the joint more securely.
Application steps:
- Slide the heat shrink over the joint before soldering or crimping
- Heat with a heat gun at medium temperature, moving constantly
- Start from the center and work outward
- The adhesive inside will melt and flow around the connection
- Let cool for 30 seconds before touching
The adhesive-lined tubing will look glossy when properly heated. If it looks dull or wrinkled, you didn't apply enough heat. Reapply carefully without overheating, which can damage the connection.
(10 pack) 10mm Silicone End Cap - 10mm →
For marine applications, always overlap the heat shrink onto the LED strip itself on both sides. This prevents water from creeping in along the strip edges.
Using Dielectric Grease for Electrical Connections
Dielectric grease is an often-overlooked protection layer that prevents corrosion at the connection point itself. It's not conductive, so it won't interfere with the electrical signal. Instead, it displaces moisture and blocks oxygen from reaching the copper.
Apply a thin layer of dielectric grease to the PCB pads before connecting. This creates a protective barrier that works in tandem with your heat shrink and sealant. Many marine electricians skip this step, which is why their connections corrode within a season.
How to apply:
- Use a small brush or cotton swab
- Apply sparingly to all three pads
- Wipe away excess before connecting
- The grease should be barely visible on the pad
The combination of dielectric grease plus heat shrink plus silicone sealant creates three layers of protection. Each layer serves a different purpose: the grease blocks oxygen, the heat shrink provides insulation and initial moisture barrier, and the sealant provides the final waterproof seal.
Applying Silicone Sealant and End Caps for Waterproofing
Silicone sealant is your final waterproofing layer. Use 100% silicone, not acrylic or polyurethane. Silicone remains flexible in temperature extremes and maintains its seal for years in saltwater environments.
Application method:
- Apply a bead of silicone around the heat shrink joint
- Smooth with a wet finger to create a uniform seal
- Cover the connection point completely
- Let cure for 24 hours before exposing to water
For the end of your LED run, use silicone end caps. These are pre-molded caps with holes for wire leads if needed. T-Toplights offers 10mm silicone end caps with 2 holes for $5.95 per 10-pack, and 10mm silicone end caps without holes for $5.95 per 10-pack.

Apply silicone sealant inside and around the end cap. The cap itself provides mechanical protection, while the sealant fills any gaps. This prevents water from wicking up the strip edges.
Best Practices for Marine LED Installation and Long-Term Maintenance
Waterproofing doesn't end at installation. Long-term durability depends on ongoing inspection and maintenance, especially in saltwater environments.
Inspection schedule:
- Monthly: Visual check for cracks in sealant or discoloration
- Quarterly: Inspect connectors for white corrosion deposits
- Annually: Test connections with a multimeter for voltage drop
Voltage drop considerations: When you waterproof a connection with heat shrink and sealant, the joint itself adds minimal resistance.
Environmental specific maintenance:
| Environment | Inspection Frequency | Primary Threat | Maintenance Action |
|---|---|---|---|
| Saltwater (ocean/bay) | Monthly | Corrosion from salt spray | Rinse with fresh water, reapply dielectric grease |
| Freshwater (lakes/rivers) | Quarterly | Algae growth, mineral deposits | Check for green deposits, clean with soft brush |
| Desert/high UV | Quarterly | UV degradation of sealant, thermal expansion | Inspect sealant for cracks, reapply if needed |
| Humid tropical | Monthly | Mold growth, accelerated corrosion | Ensure drainage, increase ventilation around connections |
Common Mistakes in Waterproofing LED Connections
Most waterproofing failures happen because installers skip steps or use the wrong materials. Here are the mistakes that cost boat owners and RV enthusiasts the most.
Conclusion
Waterproofing LED light connections requires three layers of protection: dielectric grease to block oxygen, adhesive-lined heat shrink for insulation and moisture barrier, and silicone sealant for final waterproofing. Skip any layer and your connections will corrode.
Frequently Asked Questions
What is the best waterproof sealant for marine electrical connections?
Silicone sealant is the top choice for marine electrical connections because it creates a moisture barrier that resists saltwater corrosion and UV damage. Use RTV silicone sealant (not included) paired with silicone end caps designed for your LED strip width. T-Toplights offers 10mm silicone end caps ($5.95 for a 10-pack) that fit IP68 SMD5050 strips and have 2 holes for wire leads. Apply the sealant around connection points and use end caps to seal the PCB pads completely. This combination provides a hermetic seal that prevents water intrusion on boats and RVs.
Can I use dielectric grease on LED light connections?
Yes, dielectric grease is excellent for protecting soldered joints and crimp connectors from moisture and corrosion. Apply a thin layer to electrical connections before sealing them with heat shrink tubing or silicone sealant. Dielectric grease repels water while allowing electrical current to flow, making it ideal for marine applications where saltwater exposure is common. Use it on both sides of connector interfaces and around wire gauge terminations for maximum corrosion resistance.
What is the difference between IP67 and IP68 rated connections?
IP67 connections are waterproof during temporary immersion in water up to 1 meter for 30 minutes, suitable for most boat and RV applications. IP68 connections can withstand continuous submersion at depths specified by the manufacturer, making them better for underwater or high-pressure spray environments. The MiBoxer 5-in-1 Waterproof LED Controller ($59.95) is rated IP67, which handles rain, splashing, and occasional water exposure but isn't designed for submersion. Choose IP68 if your LED strips will be fully submerged or exposed to constant high-pressure saltwater spray.
How do I prevent corrosion on outdoor LED wiring in harsh marine environments?
Prevent corrosion by combining multiple protection layers: use marine-grade heat shrink tubing with adhesive lining on all soldered joints, apply dielectric grease to connectors, seal exposed PCB pads with silicone sealant and end caps, and Saltwater environments accelerate corrosion, so prioritize hermetic seals around connection integrity points. Ensure proper wire gauge sizing to avoid voltage drop in longer runs, which can cause heat buildup and seal failure.